Code buckets
Edit on GitHubCode buckets define multiple slices of source code that can be executed in runtime. This lets projects define, implement, and execute different business logics based on different HTTP or console requests.
For example, a project can have multiple checkout processes, each having a different number of steps. The regular checkout consists of three steps, but in one of the countries, because of some business reasons, the checkout requires four steps.
The example above is the most typical case to use code buckets. However, you can use them for other types of business reasons, even for backend A/B testing.
Since the number of code buckets in a project is unlimited, you can use them for multiple purposes.
Multi-layered code inheritance with code buckets
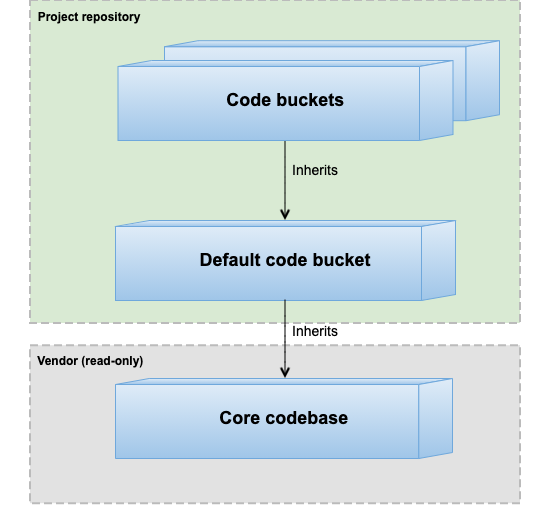
Multi-layered code inheritance in Spryker lets projects extend and customize core implementations.
Code inheritance consists of the following layers:
- Core code: the base level located in
vendor/spryker/.- Default code bucket on the project level. It’s inherited from the core and located in
src/. The source code on the project level, which is not explicitly part of a code bucket, is considered to be part of the default code bucket. - Custom code bucket on the project level. It’s inherited from the project level or the core level, or from both. All the source code related to a custom business logic is located here.
- Default code bucket on the project level. It’s inherited from the core and located in
The inheritance concept applies on a per module basis. You can define a different code bucket for each module. When multiple modules implement the same code bucket, they are used accordingly during runtime. Also, you can implement multiple code buckets of the same module—for example:
Checkout: default implementation.CheckoutFOO: FOO code bucket implementation.CheckoutBARBAR code bucket implementation.
The inheritance concept consists of two parts: physical and logical inheritance.
Physical inheritance
Physical inheritance ensures that, on the code level, the class inheritance is set up correctly. Resolvable classes on the project level should extend their corresponding resolvable classes from lower levels. Physical inheritance is used when a lower-level implementation needs to be reused or extended.
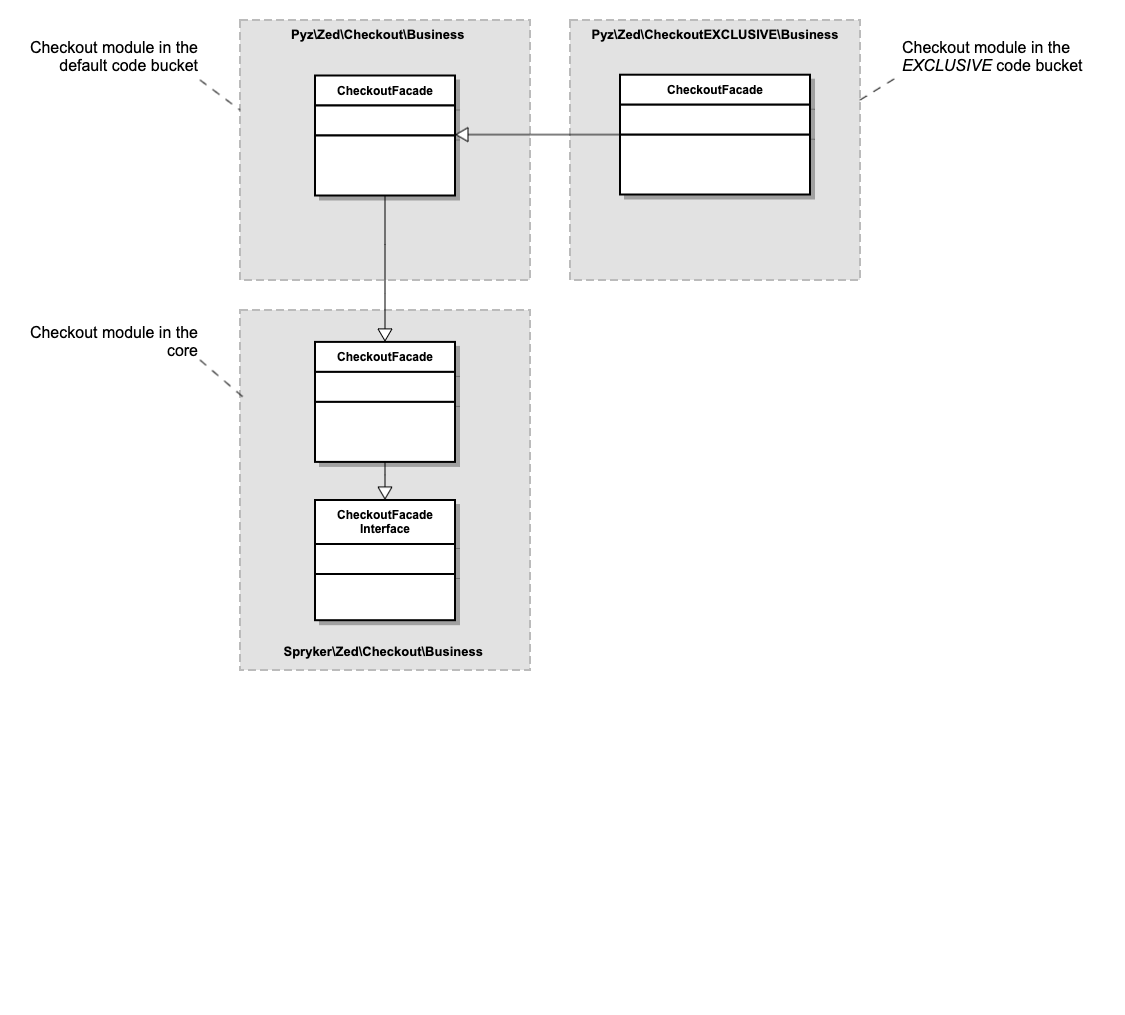
The following class diagram shows an example of physical inheritance. On the project level, CheckoutFacade from the Checkout module extends the CheckoutFacade of the Checkout module from the core. Also, on the project level, CheckoutFacade from the EXCLUSIVE code bucket in the CheckoutEXCLUSIVE module extends CheckoutFacade from the default code bucket.
Logical inheritance
Logical inheritance ensures that, during runtime, the classes belonging to the requested code bucket are loaded.
There are several types of special resolvable classes that are loaded dynamically in runtime based on the project configuration and the core namespace precedence order. To ensure the extendability of the core implementation, logical inheritance is applied at all times.
The inheritance starts on the top level and, if a resolvable PHP class is not found, falls back to lower levels. The class resolver repeats the lookup on each level until the PHP class is found. If a file can’t be resolved on any level, an exception is thrown.
If you customize the core code in your project by extending a resolvable class from the core, and your project namespaces are configured properly, because of the namespace precedence and the class resolving system, the project code is automatically wired and executed when necessary. Learn more about extending the core in Core extension.
The following table lists the classes that are automatically resolved per application layer.
| APPLICATION LAYER | RESOLVABLE CLASSES |
|---|---|
| Zed |
|
| Client |
|
| Service |
|
| Yves |
|
| Glue |
|
| Shared |
|
Only these types of classes are resolved automatically. To resolve another type of an extended class, extend the factory and replace the method that creates that class with the one that creates your extended class.
Defining the code buckets to execute
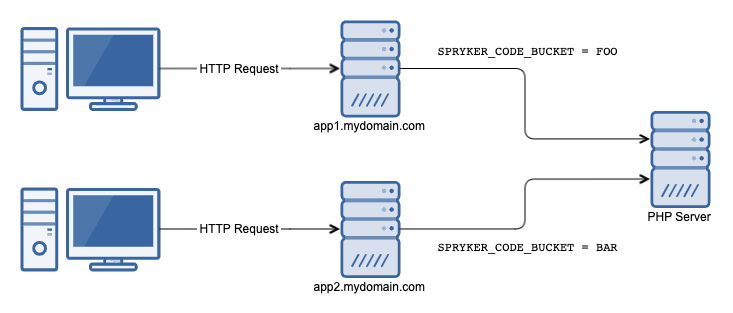
The SPRYKER_CODE_BUCKET environment variable defines which code bucket an HTTP or console request is executed under.
Environment parameters for HTTP requests are usually handled by DevOps Engineers. With different domains set up for different code buckets, they make sure that the environment variable is passed according to the requirements. From the code bucket execution perspective, the domain doesn’t matter. So, the web server can also pass different code buckets based on the client’s location or the given time.
For console commands, you can pass the environment variable as shown in the example:
SPRYKER_CODE_BUCKET=FOO vendor/bin/console name:of:command
Defining code buckets of a project
Since the PHP code owns the code bucket implementations, you must validate the value of the SPRYKER_CODE_BUCKET environment variable.
You can define the code buckets of a project in src/SprykerConfig/CodeBucketConfig.php:
<?php

namespace SprykerConfig;

use Spryker\Shared\Kernel\CodeBucket\Config\AbstractCodeBucketConfig;

class CodeBucketConfig extends AbstractCodeBucketConfig
{
    /**
     * @return string[]
     */
    public function getCodeBuckets(): array
    {
        return [
            // return the list of valid code buckets here
        ];
    }
}
This class is optional and is only used by Code Buckets.
To make sure that the Composer autoloader can load the SprykerConfig namespace, add the following PSR-4 rule to composer.json:
{
  "autoload": {
    "psr-4": {
      "SprykerConfig\\": "src/SprykerConfig/"
    }
  }
}
Application configuration with code buckets
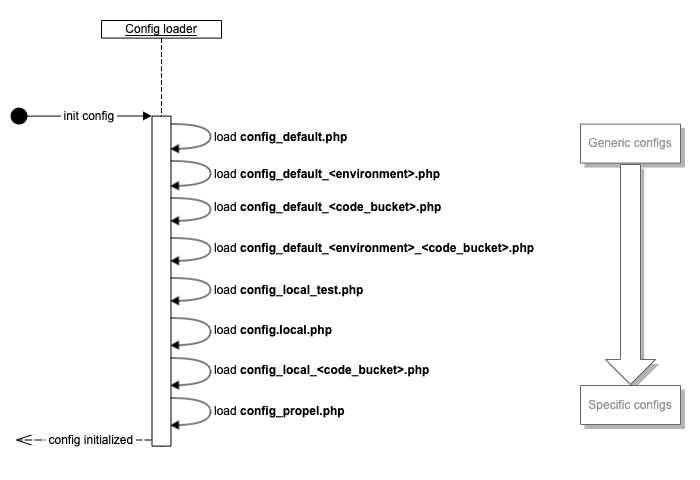
Another way to customize an application for different code buckets is to configure them differently. Since configuration files are loaded one by one, each configuration file can overwrite the configuration of the previous files. In the loading sequence, generic configuration files are placed in the beginning, and environment-specific configuration files are placed later.
Check out the configuration loading sequence in the diagram below to learn how to set up your project configuration for different environments.
To learn more about configuration management, see Configuration management.
Code buckets and stores
Before we introduced the Code Bucket concept, the Store concept had fulfilled multiple purposes in multi-store environments. One of the purposes was to provide the code base for multiple business logics. We invented code buckets to decouple this responsibility from stores. Another reason for introducing code buckets is that multiple stores often need to use the same business logic. With code buckets, stores and business logic implementations are not bound, and the three of them can be used in any combination.
From a project’s perspective, the implementation of the two solutions is very similar. In both cases, modules are suffixed to separate the code of different business logics. In case of a store, the suffix is the name of the store that derives from the APPLICATION_STORE environment variable. In case of a code bucket, the suffix is the name of the code bucket that derives from the SPRYKER_CODE_BUCKET environment variable.
If you decide to sync code buckets and stores, for simplicity, you can skip passing the SPRYKER_CODE_BUCKET environment variable for all the requests. To use code buckets but keep a business logic consistent with store names, you can use the following:
<?php

namespace SprykerConfig;

use Spryker\Shared\Kernel\CodeBucket\Config\AbstractCodeBucketConfig;

class CodeBucketConfig extends AbstractCodeBucketConfig
{
    /**
     * @return string
     */
    public function getDefaultCodeBucket(): string
    {
        // Return the Code Bucket to be used in case the SPRYKER_CODE_BUCKET environment variable is not provided.
        return APPLICATION_STORE;
    }
}
If you set stores to be in sync with code buckets, the value of the APPLICATION_STORE environment variable controls the code bucket and the store to be used at the same time.
Thank you!
For submitting the form